
안녕하세요 :)
이번 시간에는 앱을 사용함에 있어 필수 레이아웃인 리스트 형식의 ListView에 대해서 학습을 하겠습니다.
추가적으로 쇼핑몰이나 갤러리 앱에서 자주 볼 수 있는 격자 형식의 GridView까지 배워볼게요.
1. ListView
리스트를 보여주기 위해서 사용되는 ListView 입니다.
이전 시간에 배웠던 Column 위젯이나 Row위젯은 스크롤이 안되었어요. 하지만 ListView를 사용하면 스크롤을 사용할 수 있습니다.
  @override
  Widget build(BuildContext context) {
    // TODO: implement build
    return Scaffold(
      appBar: AppBar(
        title: Text(title)
      ),
      body: ListView(
        children: [
            Container(color: Colors.amber, height: 500,alignment: Alignment.center, child: const Text("AMBER")),
            Container(color: Colors.blue, height: 500,alignment: Alignment.center, child: const Text("RED"))
        ],
      )
    );
  }
1-2 ListTile
리스트 형식으로 데이터를 보여줄 때, 아이콘이나 타이틀을 보여주는 경우도 많습니다. 사용자가 레이아웃을 직접 구현할 필요 없이 ListTile 위젯을 사용해주시면 되겠습니다 :)
ListView myListTile() {
  return ListView(
    children: [
      ListTile(
          title: const Text('One-line ListTile'),
          onTap: () {},
      ),
      ListTile(
        title: const Text('With the subtitle & trailing'),
        subtitle: const Text('Using ListTitle'),
        trailing: const Icon(Icons.more_vert),
        onTap: () {},
      ),
      ListTile(
        title: const Text('With the Leading & trailing'),
        leading: const FlutterLogo(size: 40.0,),
        trailing: const Icon(Icons.autorenew),
        onTap: () {},
      ),
      ListTile(
        title: const Text('With the leading, subtitle & trailing'),
        leading: const Icon(Icons.account_box, size: 40,),
        subtitle: const Text('Add Phone Number'),
        trailing: const Icon(Icons.add),
        onTap: () {},
      ),
    ],
  );
}
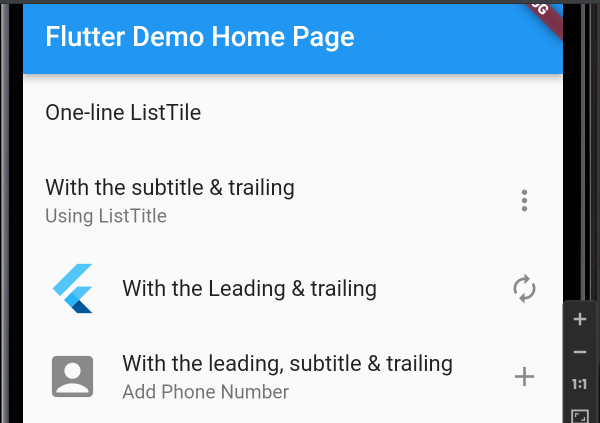
제법 앱을 개발하는 모습 같습니다 :)
2. GridView
쇼핑의 상품이나, 갤러리에서 자주 볼 수 있는 레이아웃이에요.
GridView를 사용해서 레이아웃을 구성해보겠습니다.
GridView myGridView() {
  return GridView.count(
    crossAxisCount: 2,
    padding: const EdgeInsets.all(10),
    mainAxisSpacing: 30,
    crossAxisSpacing: 10,
    children: [
      Container(
        color: Colors.teal[100],
        child: const Text("1"),
      ),
      Container(
        color: Colors.teal[200],
        child: const Text("2"),
      ),
      Container(
        color: Colors.teal[300],
        child: const Text("3"),
      ),
      Container(
        color: Colors.teal[400],
        child: const Text("4"),
      ),
      Container(
        color: Colors.teal[500],
        child: const Text("5"),
      ),
      Container(
        color: Colors.teal[600],
        child: const Text("6"),
      ),
    ],
  );
}
GridView를 사용하시면 위의 사진처럼 격자 모양의 레이아웃을 만드실 수 있겠습니다:)
감사합니다.
'개발 기록 > 플러터' 카테고리의 다른 글
| 플러터 튜토리얼 - 화면 이동 (Navigator, routes) (0) | 2023.06.14 |
|---|---|
| 플러터 튜토리얼 - Text, Icon, Image 위젯 학습 (0) | 2023.04.02 |
| 플러터 튜토리얼 - 기본이 되는 필수 Container 위젯 학습 (0) | 2023.03.29 |


